●{photoshop}之超级融图教程大集合 八款 (申精)论坛的教程我没看全 不知道有没有人发过
教程地址 https://img.lvups.com/d/file/bigpic/2022/12/25/0ltu5kpthri.com src="https://img.lvups.com/d/file/bigpic/2022/12/25/ht5xvhwp2q0.jpg" border="0" alt="" onload="return imgzoom(this,700);" onclick="javascript:window.open(this.src);" style="cursor: pointer;"/>

教程二
教程三
教程四

教程五
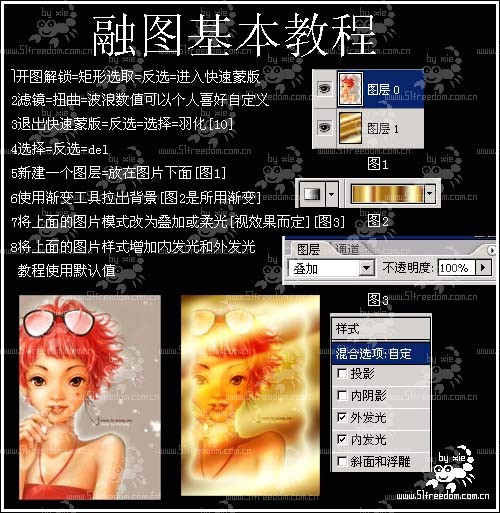
方法: 更多素材、教程、笔刷欢迎访问中华图网http:/
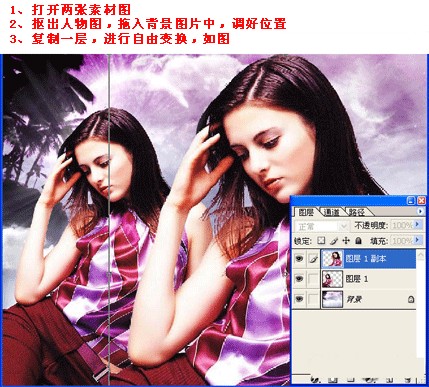
1,打开人物图,双击背景使之成为图层 更多素材、教程、笔刷欢迎访问中华图网http:/
2,用套索工具套出人物图需要的部分(粗略钩一下人物就行,不必很精细) 更多素材、教程、图网http:/
3,选择---羽化(20象素),选择--反选---编辑---清除,选择---反选 更多素材、教程、笔刷欢迎访问中华图网http:
4,打开背景图,用移动工具拖动刚才处理的人物图至背景图中,放好位置 更多素材、教程、笔刷欢迎访问中华图网h
(如果想改变人物方向,可点编辑---变换---水平翻转) 更多素材、教程、笔刷欢迎访问中华图网http:/
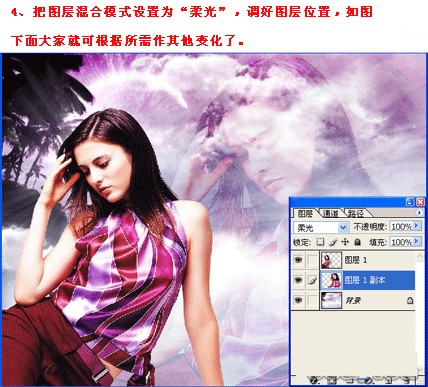
5,根据需要可调一下图层处的不透明度 更多素材、教程、笔刷欢迎访问中华图

教程六

教程七
教程八

好了全部教程都在这里了!我是在百度博客里看到了!作者见谅!~
[ 本帖最后由 厷紸杰杰 于 2007-12-7 20:51 编辑 ]
教程地址 https://img.lvups.com/d/file/bigpic/2022/12/25/0ltu5kpthri.com src="https://img.lvups.com/d/file/bigpic/2022/12/25/ht5xvhwp2q0.jpg" border="0" alt="" onload="return imgzoom(this,700);" onclick="javascript:window.open(this.src);" style="cursor: pointer;"/>
教程二
教程三
教程四
教程五
方法: 更多素材、教程、笔刷欢迎访问中华图网http:/
1,打开人物图,双击背景使之成为图层 更多素材、教程、笔刷欢迎访问中华图网http:/
2,用套索工具套出人物图需要的部分(粗略钩一下人物就行,不必很精细) 更多素材、教程、图网http:/
3,选择---羽化(20象素),选择--反选---编辑---清除,选择---反选 更多素材、教程、笔刷欢迎访问中华图网http:
4,打开背景图,用移动工具拖动刚才处理的人物图至背景图中,放好位置 更多素材、教程、笔刷欢迎访问中华图网h
(如果想改变人物方向,可点编辑---变换---水平翻转) 更多素材、教程、笔刷欢迎访问中华图网http:/
5,根据需要可调一下图层处的不透明度 更多素材、教程、笔刷欢迎访问中华图
教程六
教程七
教程八
好了全部教程都在这里了!我是在百度博客里看到了!作者见谅!~
[ 本帖最后由 厷紸杰杰 于 2007-12-7 20:51 编辑 ]
搜索更多相关主题的帖子:ps融图