
非常不错的水滴制作教程首先:这个教程不是我发明的,是photoshopCS里面的一个教程,我是装了它之后,无意中发现,是在photoshoCS安装文件夹里面的HELP文件夹里有一个Tips and Tricks.pdf文件。这是一个教程文件,觉得非常不错,所以就把它制作出来作为一个教程,以供大家学习一下,我不知道这个教程会不会己经有人发表了。所以,在此注明一下。如有,就当是学习吧。(Tips and Tricks.pdf里的教程并不是我这个教程,但是水滴的制作是按里面的教程来做的。)制作前的图片
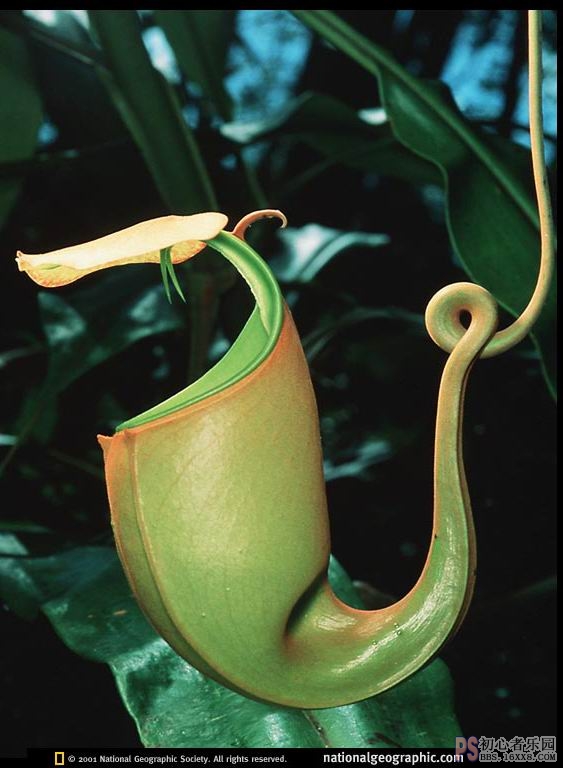
 1.jpg (167.92 KB)
非常不错的水滴制作教程
2007-5-14 17:54完成后的效果图: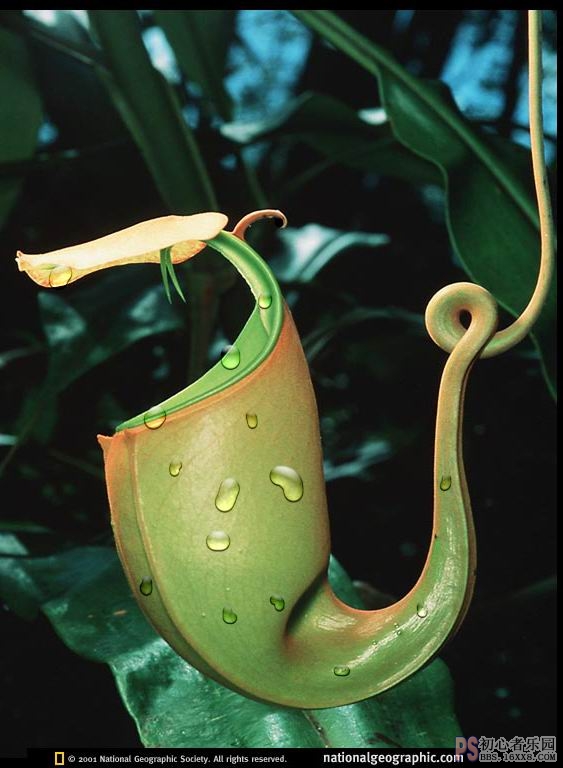 2.jpg (171.41 KB)
非常不错的水滴制作教程
2007-5-14 17:54制作过程如下。1、新建一层在需要加水滴的地方用画笔来画出一个水滴的太概形状。如图: 3.jpg (166.07 KB)
非常不错的水滴制作教程
2007-5-14 17:542、然后在调出图层样式来调整整个水滴的样式。(图层è图层样式=>混合选项;或:双击水滴图层)要设置的地方如图所示。选择:混合选项>填充不透明度为3%。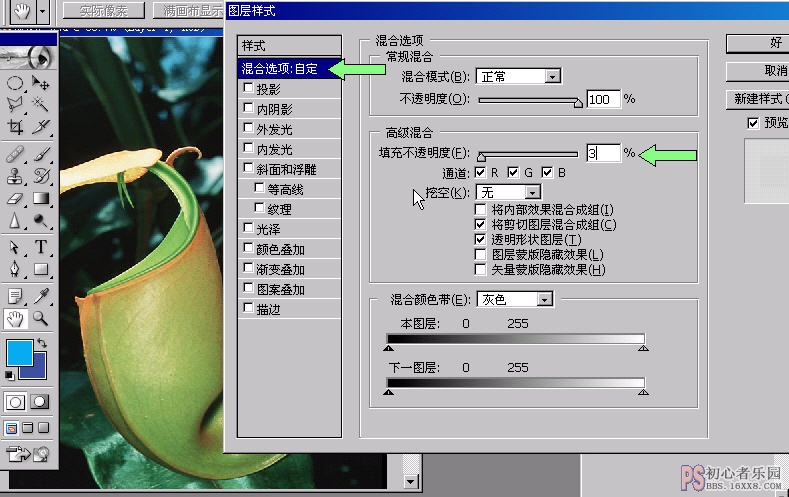 4.jpg (200.81 KB)
非常不错的水滴制作教程
2007-5-14 17:543、再选择投影选项,混合模式为:正片叠加,不透明度为100%,距离为1像素,大不为1像素。品质当中选择等高线为高斯分布,也就是像S形状的哪个图。设置如图: 5.jpg (193.53 KB)
非常不错的水滴制作教程
2007-5-14 17:544、选择内阴影,混合模式为颜色加深,不透明度为43%,距离为5,大小为10。如图设置: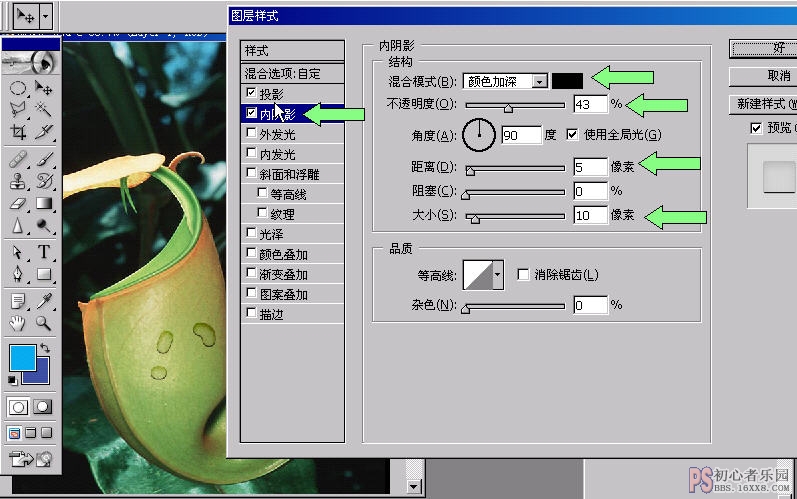 6.jpg (187.88 KB)
非常不错的水滴制作教程
2007-5-14 17:545、再选择内发光,混合模式为:叠加。不透明度为30%,杂色选择为黑色。如图: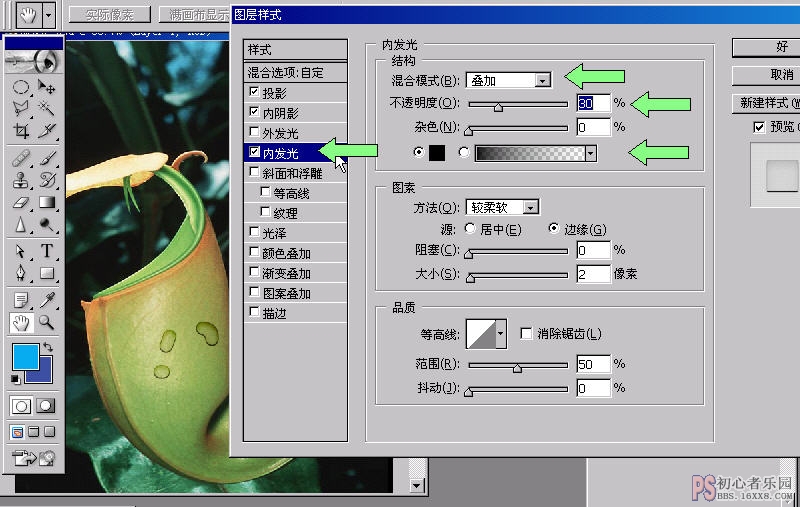 7.jpg (195.4 KB)
非常不错的水滴制作教程
2007-5-14 17:546、再选择斜面和浮雕,在结构选项中,样式选择为:内斜面,方法:雕刻清晰,深度:250%大小为:15像素,软化:10像素。在下面的阴影选项中,高光模式为滤色,选择白色,不透明度为100%。暗调模式为:颜色减淡,白色,不透明度为37%。如图设置:此时己可见水滴的形状。而且十分逼真。 8.jpg (216.51 KB)
非常不错的水滴制作教程
2007-5-14 17:54本来在此己可大功告成,但是,我们还可以再添加一些小水珠,并且不用再像上面一样从新设置这么多了。我们可以把这个样式设置保存下来,毕竟这个样式的设置太好了。保存价值非常高。所以我们可以把这样式保存下来。点击新建样式: 9.jpg (81.54 KB)
非常不错的水滴制作教程
2007-5-14 17:54在保存对话框内将它保存下来。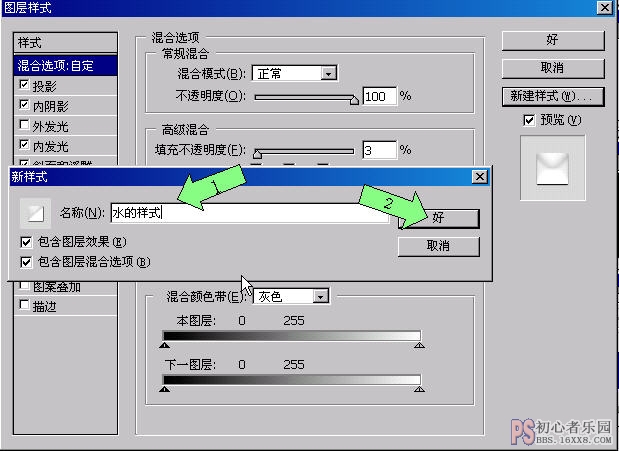 10.jpg (115.69 KB)
非常不错的水滴制作教程
2007-5-14 17:54我们再新建一层,再添加多一些小水珠就可以直接点击样式当中保存下来的水的样式了。并且以后同样可以随时使有这个样式 11.jpg (30.67 KB)
非常不错的水滴制作教程
2007-5-14 17:54
![]()
1.jpg (167.92 KB)非常不错的水滴制作教程
2007-5-14 17:54完成后的效果图:
2.jpg (171.41 KB)非常不错的水滴制作教程
2007-5-14 17:54制作过程如下。1、新建一层在需要加水滴的地方用画笔来画出一个水滴的太概形状。如图:
3.jpg (166.07 KB)非常不错的水滴制作教程
2007-5-14 17:542、然后在调出图层样式来调整整个水滴的样式。(图层è图层样式=>混合选项;或:双击水滴图层)要设置的地方如图所示。选择:混合选项>填充不透明度为3%。
4.jpg (200.81 KB)非常不错的水滴制作教程
2007-5-14 17:543、再选择投影选项,混合模式为:正片叠加,不透明度为100%,距离为1像素,大不为1像素。品质当中选择等高线为高斯分布,也就是像S形状的哪个图。设置如图:
5.jpg (193.53 KB)非常不错的水滴制作教程
2007-5-14 17:544、选择内阴影,混合模式为颜色加深,不透明度为43%,距离为5,大小为10。如图设置:
6.jpg (187.88 KB)非常不错的水滴制作教程
2007-5-14 17:545、再选择内发光,混合模式为:叠加。不透明度为30%,杂色选择为黑色。如图:
7.jpg (195.4 KB)非常不错的水滴制作教程
2007-5-14 17:546、再选择斜面和浮雕,在结构选项中,样式选择为:内斜面,方法:雕刻清晰,深度:250%大小为:15像素,软化:10像素。在下面的阴影选项中,高光模式为滤色,选择白色,不透明度为100%。暗调模式为:颜色减淡,白色,不透明度为37%。如图设置:此时己可见水滴的形状。而且十分逼真。
8.jpg (216.51 KB)非常不错的水滴制作教程
2007-5-14 17:54本来在此己可大功告成,但是,我们还可以再添加一些小水珠,并且不用再像上面一样从新设置这么多了。我们可以把这个样式设置保存下来,毕竟这个样式的设置太好了。保存价值非常高。所以我们可以把这样式保存下来。点击新建样式:
9.jpg (81.54 KB)非常不错的水滴制作教程
2007-5-14 17:54在保存对话框内将它保存下来。
10.jpg (115.69 KB)非常不错的水滴制作教程
2007-5-14 17:54我们再新建一层,再添加多一些小水珠就可以直接点击样式当中保存下来的水的样式了。并且以后同样可以随时使有这个样式
11.jpg (30.67 KB)非常不错的水滴制作教程
2007-5-14 17:54


