作者小鱼 出处:UCD博客
先看下效果!

以下是详细的photoshop教程步骤:[size=2] [/size]
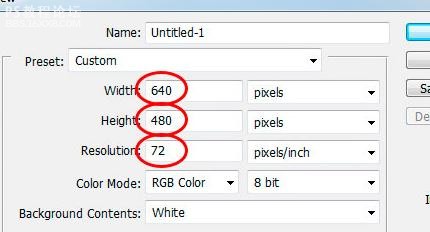
[size=2]第1步:新建文件。
[/size]
[size=2]
[/size]
[font=宋体][size=10.5pt]第[/size][/font][size=10.5pt]2[/size][font=宋体][size=10.5pt]步:添加文字
[/size][/font]

[font=宋体][size=10.5pt]第[/size][/font][size=10.5pt]3[/size][font=宋体][size=10.5pt]步:调整文字大小
[/size][/font]
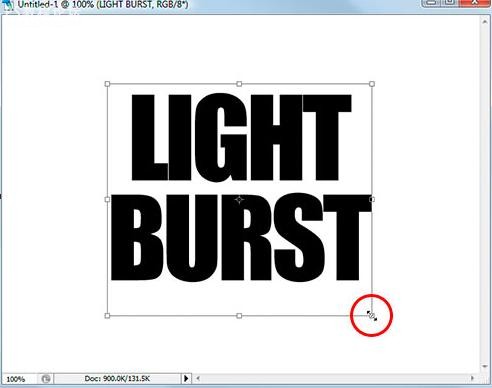
[font=宋体][size=10.5pt]第[/size][/font][size=10.5pt]4[/size][font=宋体][size=10.5pt]步:文字栅格化。
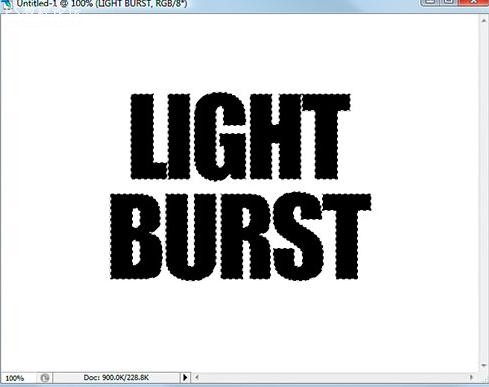
[font=宋体][size=10.5pt][font=宋体][size=10.5pt]第[/size][/font][size=10.5pt]5[/size][font=宋体][size=10.5pt]步:选择你的文字 [/size][/font]按[/size][/font][size=10.5pt]Ctrl -[/size][font=宋体][size=10.5pt]单击文字图层[/size][/font][size=10.5pt]” [/size][font=宋体][size=10.5pt]您的文字现在有一个选择区(渐入选取)
[/size][/font][/size][/font][size=3] 选择 储存选取(保存选取)
[/size]
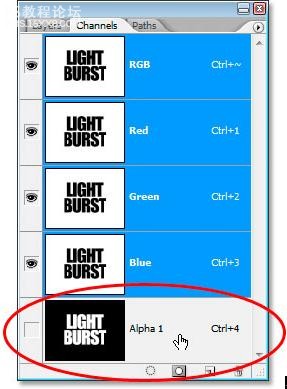
[font=宋体][size=10.5pt]切换到通道会多了一层“[/size][/font][size=10.5pt]Alpha 1[/size][font=宋体][size=10.5pt]”
[/size][/font]
[font=宋体][size=10.5pt]步骤[/size][/font][size=10.5pt]6 [/size][font=宋体][size=10.5pt]:选择文字层
[/size][/font]
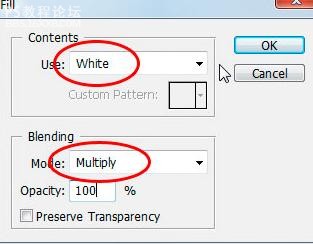
[size=10.5pt]打开“[/size][font=宋体][size=10.5pt]填充[/size][/font][size=10.5pt]”[/size][font=宋体][size=10.5pt]对话框[/size][/font][size=10.5pt]“[/size]
[size=10.5pt][font=宋体][size=10.5pt]第[/size][/font][size=10.5pt]7[/size][font=宋体][size=10.5pt]步:应用高斯模糊[/size][/font]
[font=宋体][size=10.5pt]输入值[/size][/font][size=10.5pt]4[/size][font=宋体][size=10.5pt]像素(如图)
[/size][/font][/size]
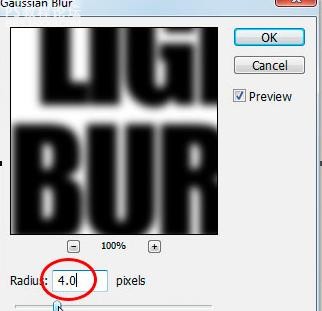
确认!
[font=宋体][size=10.5pt]第[/size][/font][size=10.5pt]8[/size][font=宋体][size=10.5pt]步:选择风格化[/size][/font]
[font=宋体][size=10.5pt],然后选择曝光[/size][/font]
[font=宋体][size=10.5pt]。如图显示[/size][/font]
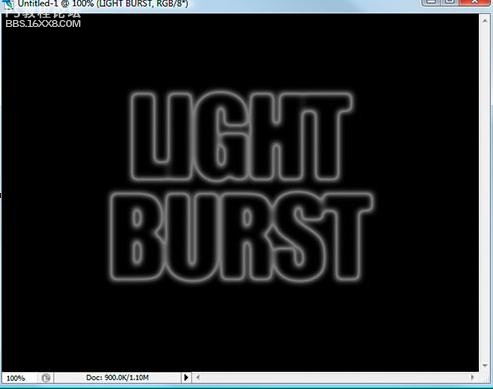
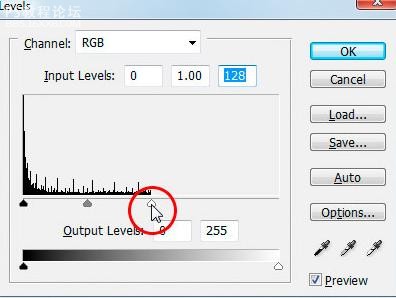
[font=宋体][size=10.5pt]步骤[/size][/font][size=10.5pt]9 [/size][font=宋体][size=10.5pt]:使用键盘快捷按[/size][/font][size=10.5pt]Ctrl +L
[/size]
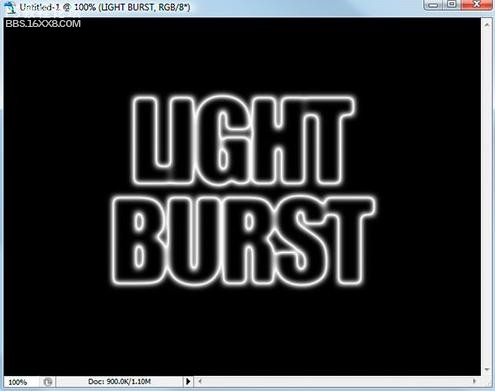
先看下效果!

以下是详细的photoshop教程步骤:[size=2] [/size]
[size=2]第1步:新建文件。
[/size]
[size=2]

[/size]
[font=宋体][size=10.5pt]第[/size][/font][size=10.5pt]2[/size][font=宋体][size=10.5pt]步:添加文字
[/size][/font]

[font=宋体][size=10.5pt]第[/size][/font][size=10.5pt]3[/size][font=宋体][size=10.5pt]步:调整文字大小
[/size][/font]

[font=宋体][size=10.5pt]第[/size][/font][size=10.5pt]4[/size][font=宋体][size=10.5pt]步:文字栅格化。
[font=宋体][size=10.5pt][font=宋体][size=10.5pt]第[/size][/font][size=10.5pt]5[/size][font=宋体][size=10.5pt]步:选择你的文字 [/size][/font]按[/size][/font][size=10.5pt]Ctrl -[/size][font=宋体][size=10.5pt]单击文字图层[/size][/font][size=10.5pt]” [/size][font=宋体][size=10.5pt]您的文字现在有一个选择区(渐入选取)
[/size][/font][/size][/font][size=3] 选择 储存选取(保存选取)
[/size]

[font=宋体][size=10.5pt]切换到通道会多了一层“[/size][/font][size=10.5pt]Alpha 1[/size][font=宋体][size=10.5pt]”
[/size][/font]

[font=宋体][size=10.5pt]步骤[/size][/font][size=10.5pt]6 [/size][font=宋体][size=10.5pt]:选择文字层
[/size][/font]

[size=10.5pt]打开“[/size][font=宋体][size=10.5pt]填充[/size][/font][size=10.5pt]”[/size][font=宋体][size=10.5pt]对话框[/size][/font][size=10.5pt]“[/size]
[size=10.5pt][font=宋体][size=10.5pt]第[/size][/font][size=10.5pt]7[/size][font=宋体][size=10.5pt]步:应用高斯模糊[/size][/font]
[font=宋体][size=10.5pt]输入值[/size][/font][size=10.5pt]4[/size][font=宋体][size=10.5pt]像素(如图)
[/size][/font][/size]

确认!
[font=宋体][size=10.5pt]第[/size][/font][size=10.5pt]8[/size][font=宋体][size=10.5pt]步:选择风格化[/size][/font]
[font=宋体][size=10.5pt],然后选择曝光[/size][/font]
[font=宋体][size=10.5pt]。如图显示[/size][/font]

[font=宋体][size=10.5pt]步骤[/size][/font][size=10.5pt]9 [/size][font=宋体][size=10.5pt]:使用键盘快捷按[/size][/font][size=10.5pt]Ctrl +L
[/size]


