
原图:
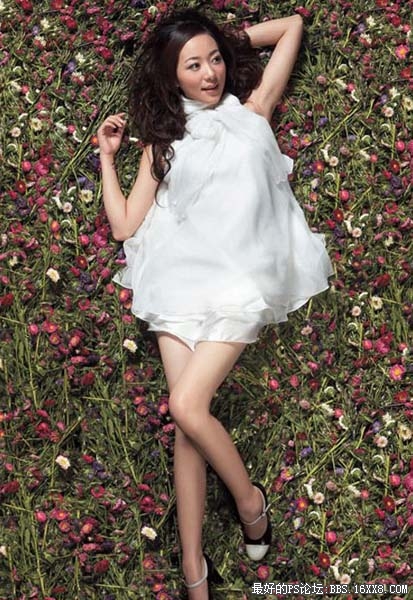
效果图:

,
1.将背景层复制一层,生成背景副本。在副本上磨皮。
2.使用曲线调整图层适当的调整下图片的明暗度:输出值:133 输入值:120
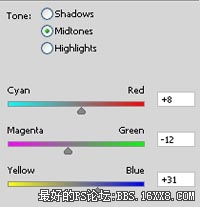
3.使用色彩平衡调整图层稍微调整一下图片的颜色,参考数值为:+8,-12,+31;效果如图

,
4.按住ALT+CTRL+SHIFT的同时按住E键,执行盖印图层的操作.这样会得到一个新的图层,将这个图层复制一层,取名为图层1,在图层1上执行滤镜-模糊-高斯模糊命令,半径设为4个象素.图层混合模式设为变暗,不透明度设为86%;效果如图

5.盖印图层,将得到的新图层复制一层取名为图层2,将它的图层混合模式设为柔光,不透明度设置设置为60%;
6.再次盖印图层,将得到的新图层取名为图层3.
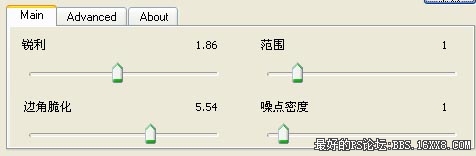
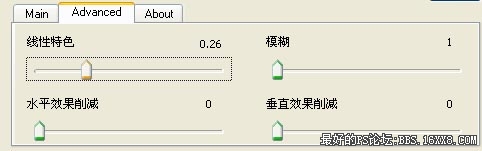
7.使用TOPAZ滤镜
photoshop教程
,
8.将图层3复制一层,高斯模糊4个象素,混合模式设置为滤色,不透明度设置为60%

9.使用白色的画笔加点雪花,再加点装饰就好了.
作者:天使鱼的梦 来源:思缘教程网
效果图:
,
1.将背景层复制一层,生成背景副本。在副本上磨皮。
2.使用曲线调整图层适当的调整下图片的明暗度:输出值:133 输入值:120
3.使用色彩平衡调整图层稍微调整一下图片的颜色,参考数值为:+8,-12,+31;效果如图
,
4.按住ALT+CTRL+SHIFT的同时按住E键,执行盖印图层的操作.这样会得到一个新的图层,将这个图层复制一层,取名为图层1,在图层1上执行滤镜-模糊-高斯模糊命令,半径设为4个象素.图层混合模式设为变暗,不透明度设为86%;效果如图
5.盖印图层,将得到的新图层复制一层取名为图层2,将它的图层混合模式设为柔光,不透明度设置设置为60%;
6.再次盖印图层,将得到的新图层取名为图层3.
7.使用TOPAZ滤镜
photoshop教程
,
8.将图层3复制一层,高斯模糊4个象素,混合模式设置为滤色,不透明度设置为60%
9.使用白色的画笔加点雪花,再加点装饰就好了.
作者:天使鱼的梦 来源:思缘教程网


