四.按住Ctrl点击“RGB通道”载入选区,按Shift+Ctrl+I “反选”选区。按Alt+Delete “填充前景色”,然后按Ctrl+D“取消选区”。![按此在新窗口浏览图片](https://img.lvups.com/d/file/bigpic/2022/12/25/1ulff3oh1lr.jpg)
![按此在新窗口浏览图片](https://img.lvups.com/d/file/bigpic/2022/12/25/s0qy21wb4ej.jpg)
![按此在新窗口浏览图片](https://img.lvups.com/d/file/bigpic/2022/12/25/gof5arsioqt.jpg)
![按此在新窗口浏览图片](https://img.lvups.com/d/file/bigpic/2022/12/25/e5znfhtmht5.jpg)
![按此在新窗口浏览图片](https://img.lvups.com/d/file/bigpic/2022/12/25/nipvj2fg105.jpg)
![按此在新窗口浏览图片](https://img.lvups.com/d/file/bigpic/2022/12/25/c2klvaluuev.jpg)
![按此在新窗口浏览图片](https://img.lvups.com/d/file/bigpic/2022/12/25/g1bd0owp4o4.jpg)
![按此在新窗口浏览图片](https://img.lvups.com/d/file/bigpic/2022/12/25/3mefuxnqmf3.jpg)
![按此在新窗口浏览图片](https://img.lvups.com/d/file/bigpic/2022/12/25/r3di1eraaby.jpg)
![按此在新窗口浏览图片](https://img.lvups.com/d/file/bigpic/2022/12/25/3bwlhslwwoq.jpg)
![按此在新窗口浏览图片](https://img.lvups.com/d/file/bigpic/2022/12/25/vjvtbebxzcx.jpg)
![按此在新窗口浏览图片](https://img.lvups.com/d/file/bigpic/2022/12/25/4o0c1j0dayl.jpg)
![按此在新窗口浏览图片](https://img.lvups.com/d/file/bigpic/2022/12/25/iwuyhxy42xr.jpg)
![按此在新窗口浏览图片](https://img.lvups.com/d/file/bigpic/2022/12/25/d5hdmqslinv.jpg)
![按此在新窗口浏览图片](https://img.lvups.com/d/file/bigpic/2022/12/25/ag3alacqe5e.jpg)
![按此在新窗口浏览图片](https://img.lvups.com/d/file/bigpic/2022/12/25/rvqp0gh4px3.jpg)
![按此在新窗口浏览图片](https://img.lvups.com/d/file/bigpic/2022/12/25/1ulff3oh1lr.jpg)
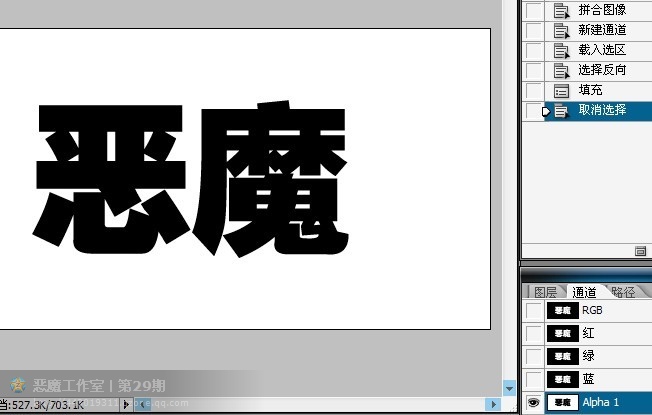
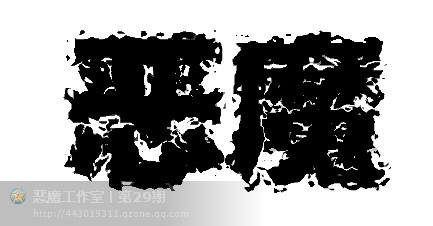
五.滤镜—扭曲—“海洋波纹”,波纹大小为8波纹幅度为7,得到效果如下。
![按此在新窗口浏览图片](https://img.lvups.com/d/file/bigpic/2022/12/25/s0qy21wb4ej.jpg)
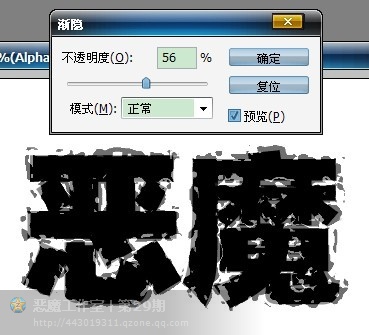
六.按Shift+Ctrl+F“渐隐”(可以从“编辑”菜单进,用了滤镜后不进行任何操作才可以用渐隐哦!)不透明度设置为56%。
![按此在新窗口浏览图片](https://img.lvups.com/d/file/bigpic/2022/12/25/gof5arsioqt.jpg)
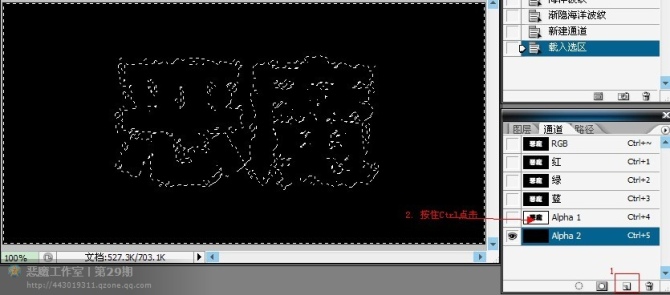
七.“创建新通道”,按住Ctrl点击“ Alpha 1 ” “载入选区”。
![按此在新窗口浏览图片](https://img.lvups.com/d/file/bigpic/2022/12/25/e5znfhtmht5.jpg)
八.按Alt+Delete “填充前景色”,然后按Ctrl+D “取消选区”。
![按此在新窗口浏览图片](https://img.lvups.com/d/file/bigpic/2022/12/25/nipvj2fg105.jpg)
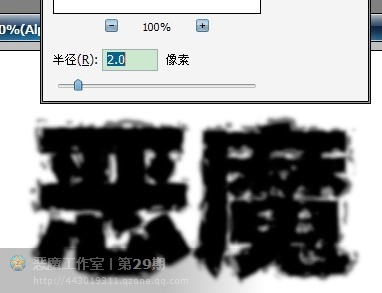
九.滤镜—模糊—“高斯模糊”,半径为2.
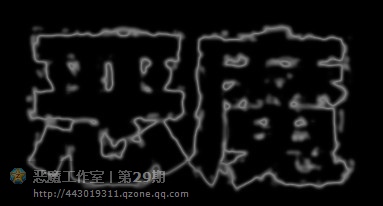
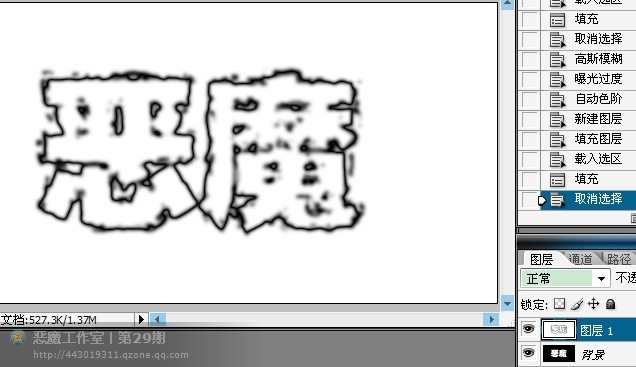
![按此在新窗口浏览图片](https://img.lvups.com/d/file/bigpic/2022/12/25/c2klvaluuev.jpg)
十.滤镜—风格化—“曝光过度”。
![按此在新窗口浏览图片](https://img.lvups.com/d/file/bigpic/2022/12/25/g1bd0owp4o4.jpg)
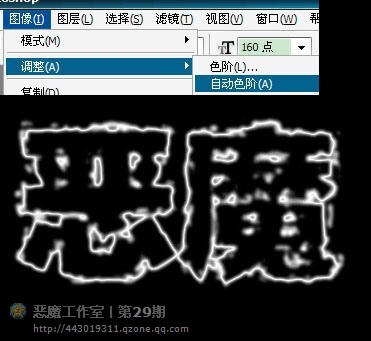
十一.图像—调整—“自动色阶”。效果如下:
![按此在新窗口浏览图片](https://img.lvups.com/d/file/bigpic/2022/12/25/3mefuxnqmf3.jpg)
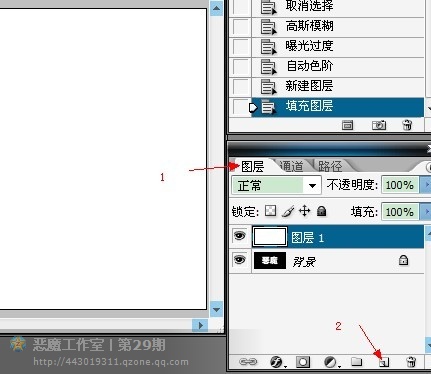
十二.回到“图层”面板,点击“创建新图层”,按Alt+Dlete “填充前景色”。
![按此在新窗口浏览图片](https://img.lvups.com/d/file/bigpic/2022/12/25/r3di1eraaby.jpg)
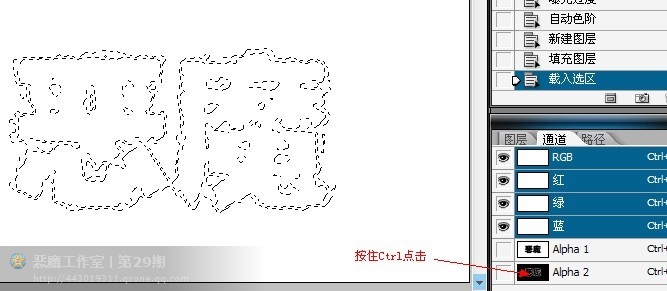
十三.回到“通道”面板,按住Ctrl点击Alpha 2通道“载入选区”。
![按此在新窗口浏览图片](https://img.lvups.com/d/file/bigpic/2022/12/25/3bwlhslwwoq.jpg)
十四.按Ctrl+Delete “填充背景色”,再按Ctrl+D “取消选区”。
![按此在新窗口浏览图片](https://img.lvups.com/d/file/bigpic/2022/12/25/vjvtbebxzcx.jpg)
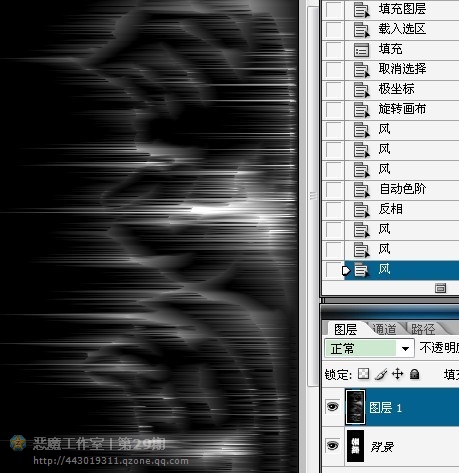
十五.滤镜—扭曲—“极坐标”,选择“极坐标到平面坐标”。然后顺时钟90度“旋转画布”。
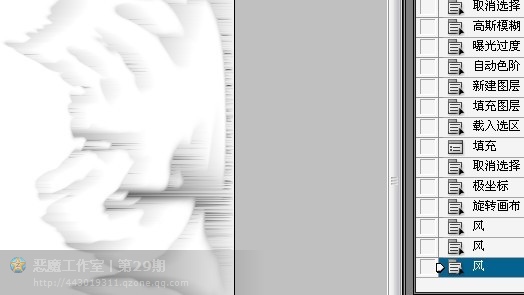
![按此在新窗口浏览图片](https://img.lvups.com/d/file/bigpic/2022/12/25/4o0c1j0dayl.jpg)
十六.滤镜—风格化—“风”,属性如下。
![按此在新窗口浏览图片](https://img.lvups.com/d/file/bigpic/2022/12/25/iwuyhxy42xr.jpg)
十七.按Ctrl+F再用滤镜“风”,按两次。
![按此在新窗口浏览图片](https://img.lvups.com/d/file/bigpic/2022/12/25/d5hdmqslinv.jpg)
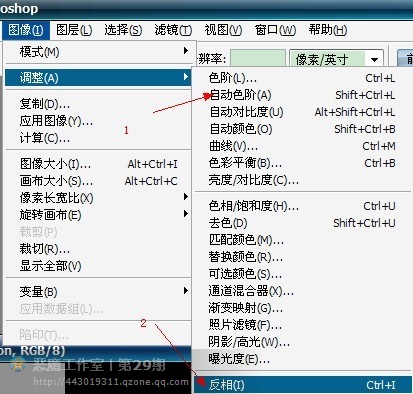
十八.图像—调整—“自动色阶”,然后再按Ctrl+I “反相”。
![按此在新窗口浏览图片](https://img.lvups.com/d/file/bigpic/2022/12/25/ag3alacqe5e.jpg)
十九.按Ctrl+F再用滤镜“风”,连按“3次”哦!
![按此在新窗口浏览图片](https://img.lvups.com/d/file/bigpic/2022/12/25/rvqp0gh4px3.jpg)